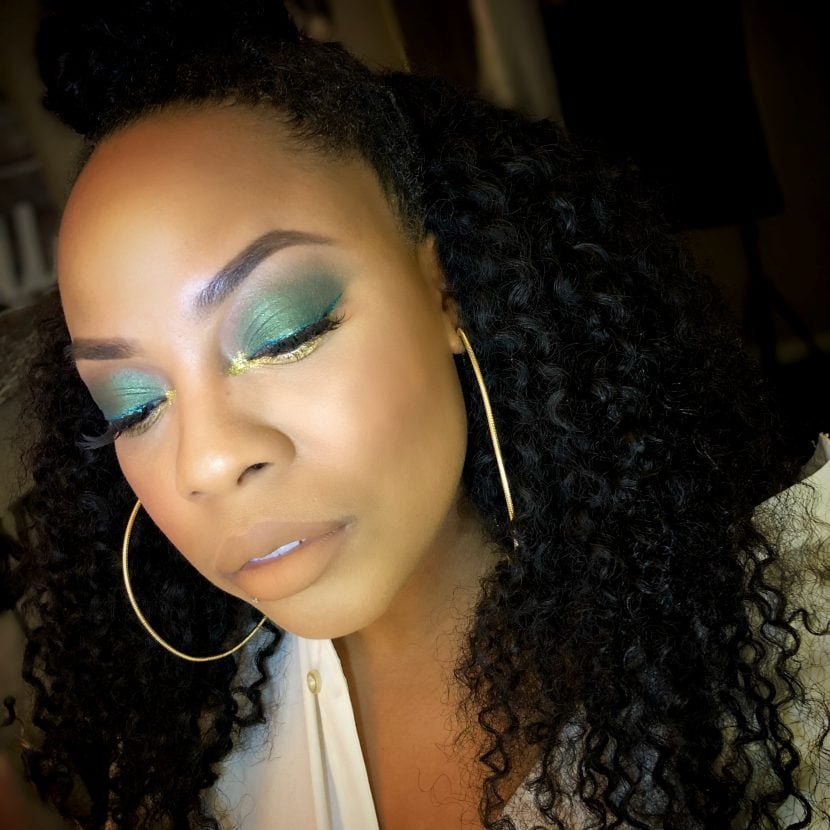
I thought I would do something festive today. Who am I kidding? Anytime there is an opportunity to wear bright colors and glitter in everyday life, I’m all over it! I decided to do a bold green eyeshadow look with gold on the lower lash line and gold glitter on the inner corner. I will give you a list of products and photos for reference. If you don’t have the products I use, then please just use what you have.
Materials
Eyeshadows (Two Faced Chocolate Gold palette)
Eyeshadow Brushes
Mascara
False Lashes w/Lash Glue (optional)
Eyeliner Pencil (black and gold)
Liquid Eyeliner (green)
Gold Glitter
Glitter Adhesive
Makeup Wipes

Here are the eyeshadow brushes that we will be using. I inserted a numbered photo of the brushes to make it easier to follow.

Eyeshadow Brushes
1. Fluffy Blending Brush
2. Flat Synthetic Brush
3. Small Blending Brush
4. Medium Blending Brush
5. Firm Flat Brush
6. Soft Small Flat Brush
7. Tiny Brush
Create this green eyeshadow look with me
Here is the Two Faced Gold Chocolate Bar palette numbered.

Let’s begin
I start out with my brows done and my eyelids prepped (concealer set with powder). I do my foundation last because the eyeshadows are highly pigmented and have some fall out. Once the eyeshadows on the lid are complete I move on to my foundation, refine my brows again, then continue completing the look on the lower lash line.
STEPS
1. Take the fluffy blending brush (brush#1) and pick up the first color (So Boujee). Sweep color #1 across the crease in windshield wiper motions, back and forth until well blended. Using the same brush, dip it into color#2 (Cocoa Truffle) and place it slightly under So Boujee. Both of these colors will be used as the transition.
Transition colors help the lid color(s) to blend seamlessly. Unless you want a different effect, transition colors are key to starting an eyelook.
Keep blending with the same motions until the color is well blended. It is ok to get some of the color on the lid but try to keep this area free of color.

2. Next grab the metallic green eyeshadow, color #2 (Money Bags) with the flat synthetic brush #2. Pack Money Bags on the lid. If there is a little fallout don’t worry about it. We will clean it with a makeup wipe later since we are doing our foundation last.

3. After packing Money Bags on the lid blend it out in the crease with the small blending brush #3. Start blending in small circles. Add a bit more color once it starts to blend away. Continue until it is well blended. Add a little more So Boujee to the crease to assist with blending, if needed. If the green eyeshadow is not intense enough on the lid you can use fix+ or water to intensify it. I did not need this step with the Two Faced Gold palette.

4. Now that the lid color is well blended use a makeup wipe and clean up any fallout. Pick up your green liquid liner and line your lashes. I like to create a wing. I used glam aqua luxe liner by NYX and the lashes are by Bold Face Makeup in the style Doll Me Up.
If you are using false lashes apply your mascara and add your lashes.
If you are not applying falsies curl your natural lashes and apply mascara.

5. At this point I do my foundation routine and touch up my brows.
Back to the eyelook
Tightline (line the upper waterline) with black eyeliner. On the lower lash line use the gold eyeliner. I used a gold liner from Colourpop.
Once you are finished grab the beautiful gold in the palette called Chocolate Gold. This is color #4. Push it into the lower lash line with your firm flat brush #5. Use the same brush and lightly blend the color.
Add mascara to the lower lash line and highlight under the brow with the last color Rollin’ In Dough. Apply the brow bone highlight with your soft small flat brush #6.

6. We are almost done.
At this point you can leave the look like this or you can take it up a notch and add gold glitter to the inner corner of the eye.
Take your last brush #7 and apply your glitter adhesive. I’m using one by Ben Nye. Dip your damp brush into the glitter and apply it to the inner corner.
Make sure you are using glitter that is safe for the eyes.

You are all done! This is a fun look. If you wanted to tone it down a bit go with a matte green shade instead of metallic. If you had fun with this look check out this one 🙂
Thanks for hanging out!
XO Terreana